Clockworks Flyff Wiki
  • Welcome
    • Overview
    • Quickstart Guide
  • FAQ
  • Discord
  • 🌸Seasons
    • What are Seasons?
    • Season FAQ
    • Season 6 Changes
      • Milestones
      • Season 6 Battle Pass
    • Season Rewards (Tiers)
  • ⚙️Systems
    • Achievements
    • Important NPCs
    • Clockwork Tokens (CWT)
      • Pang's Discount Store (Pang Bundle)
      • Scroll of Premium
      • Scroll of Party Level Save
      • Scroll of Couple Level Save
    • Clockworks Chips
    • Angel Coins
    • Voting and VP
      • Discord vote notifications
      • API vote tracker
    • Furniture
    • Stat Dice
    • Parties
    • Guilds
    • Sphere Grid
    • Upgrading
      • Awakening & Angel Awakening
      • Ultimate & Angelic Conversion
      • Jewel Setting and Creation
      • Weapon reroll
      • Monster Cards and Piercings
    • Pets
      • Pickup pets (buff pets)
      • Raised pets (stat pets)
    • Blessed & Cursed Exchange
    • Hephaestus Weapons (Star Weapons)
  • ⚡Features
    • Record Book
    • Anarchy
    • Angel Rank
    • Chat Rooms
    • Legend Score
    • Daily Quests & Eldeon Quest
    • Server Quests
    • Request Money for Mail
    • Equip Switch
    • Glyphs
    • Couple
    • Farm Counter
    • Tank AI
    • Damage Statistics & Testing Grounds
    • Challenges
    • Collecting
    • Loot Auctions
    • Solo Self-Found Mode (SSF)
  • 🎉Activities
    • World bosses
      • Rangda & Aahan
    • Eldeon's Castle Raid
    • Rifts
    • Dungeons (system)
    • Colosseum Stadium
    • Endless Tower
    • Asmodan's Trials
    • Hunter Games
    • PvP
      • Royal Rumble
      • Siege/Memento Siege
      • Guild Clash
    • Rainbow Race
    • Stoney's Rock Counting Game
  • ✨Quality of Life
    • Teleporter
    • F-Tool
    • Itemlist
    • Shop Search
    • Parties & Party Finder
    • Guild Finder
    • Raised Pet Reroll (Quick Pet Mistake)
    • Guaranteed upgrades
    • Inventory management
      • Petfilter
      • Backpack & Extra Bags
      • Quick Sell & Buy Back
    • Automatic Powerups & Powerup Bag
    • Buffs
    • AFK Vendor & AFK Collector
    • Miscellaneous QoL
      • Consumable Shop
      • Enemy Aggro Indicator
      • Chat Shortcuts
      • Stat Bonus Display
      • Guild Nicknames
  • 📔Guides
    • Classes Guide
      • Templar
      • Slayer
      • Seraph
      • Forcemaster
      • Mentalist
      • Arcanist
      • Crackshooter
      • Harlequin
    • General Progression Guide
    • Upgrading Guide
    • Leveling Guide
    • Dungeons Guide
      • Savage Wilds
      • Isle of Nightmares
      • Abyssal Cove of the Ancients
      • La Christiana A
      • Aminus & Cursed Aminus
      • Catacombs of Anguish
      • Ankou's Asylum
      • Kalgas Cave
      • Snowy Peaks
      • Sky Forest
      • Blessing of Deathwing & Curse of Deathwing
      • Craft of Hephaestus
      • Dark Trails
      • Mysterious Garden
      • Ragefire Chasm
      • Stratholme
    • Class Gear Guides
      • Templar Gear Guide
      • Slayer Gear Guide
      • Seraph Gear Guide
      • Forcemaster Gear Guide
      • Mentalist Gear Guide
      • Arcanist Gear Guide
      • Crackshooter Gear Guide
      • Harlequin Gear Guide
    • Awakening Guide
    • Pet Bead Guide
    • How do I...?
    • Where do I...?
  • 🔍Detailed Information
    • Overview
    • Details: Parties
    • Details: Maps
    • Details: Angel Rank
    • Details: Raised Pets
    • Details: Legend Score
    • Details: Guild Level Buffs
    • Details: Anarchy Buffs
    • Details: Siege Medals
    • Details: The Colosseum
    • Details: Royal Rumble & Marks of Death
    • Details: Set Upgrade Bonuses
    • Details: Jewelry
      • Jewelry: Savage Wilds
      • Jewelry: Templar
      • Jewelry: Slayer
      • Jewelry: Seraph
      • Jewelry: Forcemaster
      • Jewelry: Mentalist
      • Jewelry: Arcanist
      • Jewelry: Crackshooter
      • Jewelry: Harlequin
    • Details: Upgrade Rates
    • Details: Jewels
    • Details: Collecting
    • Details: Couple
    • Details: Class/Job Tree
    • Details: Monster HP/XP Table
    • Details: Auras and Weapon Glow
Powered by GitBook
On this page
  1. Guides
  2. Dungeons Guide

Sky Forest

PreviousSnowy PeaksNextBlessing of Deathwing & Curse of Deathwing

Last updated 1 year ago

Sky Forest drops Blessed Jewel Plans, used to construct .

The dungeon features 6 totems located on various island, connected by bridges. There is no Easy Mode for this dungeon.

In Sky Forest, the boss is resistant against Magical Damage.

Always let the tank enter the boss room first. There's a high chance that the boss will spot you immediately and attack you, so waiting in the boss room can be quite dangerous.

The boss room for Sky Forest is very tight and there are many obstacles to click on. Keep your camera zoomed in slightly to avoid your camera getting stuck behind the forest canopy, and avoiding standing too close to the edges of arena, as invisible walls can be unpredictable.

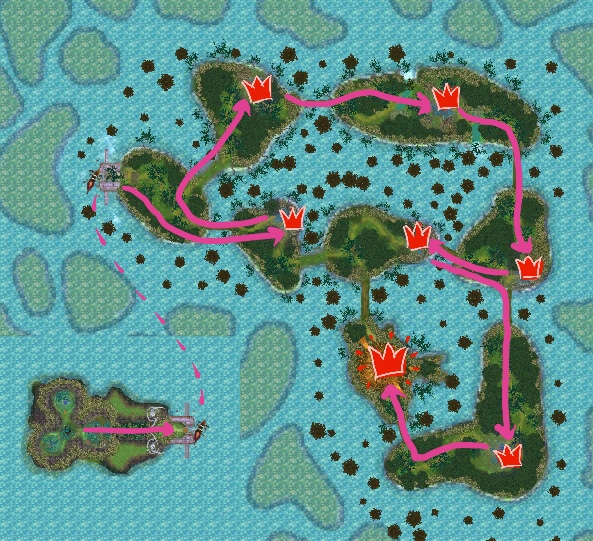
In the one route clear, you'll start by heading straight to take out the first totem. You'll then backtrack and make your way clockwise around the islands, destroying the second, third, and fourth totems. You'll have to take a short detour for the fifth totem, then backtack for the sixth totem, which will lead you to the boss.

Full-clearing on a single route is fairly easy for Sky Forest, and only requires some slight detouring before the third totem and after the fifth totem.

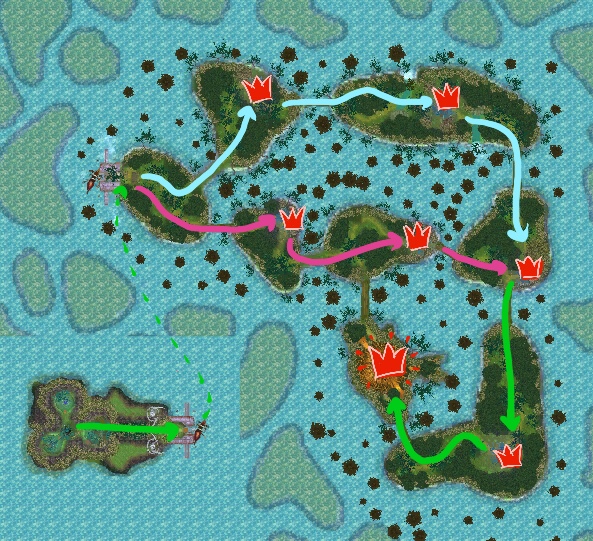
The two route clear of Sky Forest dramatically simplifies the map, splitting the party into two groups to clear the top and middle separately, then meeting together for their third and fourth totem. Doing so also leads to a fairly quick and easy full clear.

📔
Blessed Jewelry