Clockworks Flyff Wiki
  • Welcome
    • Overview
    • Quickstart Guide
  • FAQ
  • Discord
  • 🌸Seasons
    • What are Seasons?
    • Season FAQ
    • Season 6 Changes
      • Milestones
      • Season 6 Battle Pass
    • Season Rewards (Tiers)
  • ⚙️Systems
    • Achievements
    • Important NPCs
    • Clockwork Tokens (CWT)
      • Pang's Discount Store (Pang Bundle)
      • Scroll of Premium
      • Scroll of Party Level Save
      • Scroll of Couple Level Save
    • Clockworks Chips
    • Angel Coins
    • Voting and VP
      • Discord vote notifications
      • API vote tracker
    • Furniture
    • Stat Dice
    • Parties
    • Guilds
    • Sphere Grid
    • Upgrading
      • Awakening & Angel Awakening
      • Ultimate & Angelic Conversion
      • Jewel Setting and Creation
      • Weapon reroll
      • Monster Cards and Piercings
    • Pets
      • Pickup pets (buff pets)
      • Raised pets (stat pets)
    • Blessed & Cursed Exchange
    • Hephaestus Weapons (Star Weapons)
  • ⚡Features
    • Record Book
    • Anarchy
    • Angel Rank
    • Chat Rooms
    • Legend Score
    • Daily Quests & Eldeon Quest
    • Server Quests
    • Request Money for Mail
    • Equip Switch
    • Glyphs
    • Couple
    • Farm Counter
    • Tank AI
    • Damage Statistics & Testing Grounds
    • Challenges
    • Collecting
    • Loot Auctions
    • Solo Self-Found Mode (SSF)
  • 🎉Activities
    • World bosses
      • Rangda & Aahan
    • Eldeon's Castle Raid
    • Rifts
    • Dungeons (system)
    • Colosseum Stadium
    • Endless Tower
    • Asmodan's Trials
    • Hunter Games
    • PvP
      • Royal Rumble
      • Siege/Memento Siege
      • Guild Clash
    • Rainbow Race
    • Stoney's Rock Counting Game
  • ✨Quality of Life
    • Teleporter
    • F-Tool
    • Itemlist
    • Shop Search
    • Parties & Party Finder
    • Guild Finder
    • Raised Pet Reroll (Quick Pet Mistake)
    • Guaranteed upgrades
    • Inventory management
      • Petfilter
      • Backpack & Extra Bags
      • Quick Sell & Buy Back
    • Automatic Powerups & Powerup Bag
    • Buffs
    • AFK Vendor & AFK Collector
    • Miscellaneous QoL
      • Consumable Shop
      • Enemy Aggro Indicator
      • Chat Shortcuts
      • Stat Bonus Display
      • Guild Nicknames
  • 📔Guides
    • Classes Guide
      • Templar
      • Slayer
      • Seraph
      • Forcemaster
      • Mentalist
      • Arcanist
      • Crackshooter
      • Harlequin
    • General Progression Guide
    • Upgrading Guide
    • Leveling Guide
    • Dungeons Guide
      • Savage Wilds
      • Isle of Nightmares
      • Abyssal Cove of the Ancients
      • La Christiana A
      • Aminus & Cursed Aminus
      • Catacombs of Anguish
      • Ankou's Asylum
      • Kalgas Cave
      • Snowy Peaks
      • Sky Forest
      • Blessing of Deathwing & Curse of Deathwing
      • Craft of Hephaestus
      • Dark Trails
      • Mysterious Garden
      • Ragefire Chasm
      • Stratholme
    • Class Gear Guides
      • Templar Gear Guide
      • Slayer Gear Guide
      • Seraph Gear Guide
      • Forcemaster Gear Guide
      • Mentalist Gear Guide
      • Arcanist Gear Guide
      • Crackshooter Gear Guide
      • Harlequin Gear Guide
    • Awakening Guide
    • Pet Bead Guide
    • How do I...?
    • Where do I...?
  • 🔍Detailed Information
    • Overview
    • Details: Parties
    • Details: Maps
    • Details: Angel Rank
    • Details: Raised Pets
    • Details: Legend Score
    • Details: Guild Level Buffs
    • Details: Anarchy Buffs
    • Details: Siege Medals
    • Details: The Colosseum
    • Details: Royal Rumble & Marks of Death
    • Details: Set Upgrade Bonuses
    • Details: Jewelry
      • Jewelry: Savage Wilds
      • Jewelry: Templar
      • Jewelry: Slayer
      • Jewelry: Seraph
      • Jewelry: Forcemaster
      • Jewelry: Mentalist
      • Jewelry: Arcanist
      • Jewelry: Crackshooter
      • Jewelry: Harlequin
    • Details: Upgrade Rates
    • Details: Jewels
    • Details: Collecting
    • Details: Couple
    • Details: Class/Job Tree
    • Details: Monster HP/XP Table
    • Details: Auras and Weapon Glow
Powered by GitBook
On this page
  1. Guides
  2. Dungeons Guide

Kalgas Cave

PreviousAnkou's AsylumNextSnowy Peaks

Last updated 1 year ago

Kalgas Cave is run for level 130 gear, which is the strongest set before , and also required in the crafting of Blessed/Cursed gear.

In addition to armor sets, the dungeon also drops rare A-grade weapon cards, and 7% armor cards. The boss card, [Ultimate] Kalgas Card is also a very powerful PvE card, and oftentimes used on a secondary weapon.

The dungeon features 2 totems, guarded by 2 mini-bosses. After all totems and mini-bosses are defeated, 4 additional totems will spawn inside the boss room. Destroying the final 4 totems will spawn the boss.

It's recommended to have 200% speed when clearing Kalgas Cave, due to how incredibly long it takes to run from the entrance to the boss.

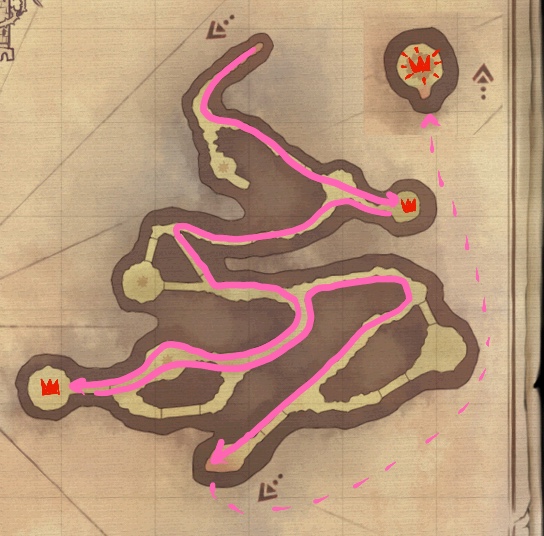
The one route clear of Kalgas is very straightforward, starting with the first totem and mini-boss, and moving to the second totem and mini-boss. After the second set, players will have to take a lengthy backtrack to get back to the path that leads to the boss.

Full-clearing Kalgas Cave is generally recommended since most of the enemies can be found along the way, with only minor backtracking in the final triangle path leading up to the boss.

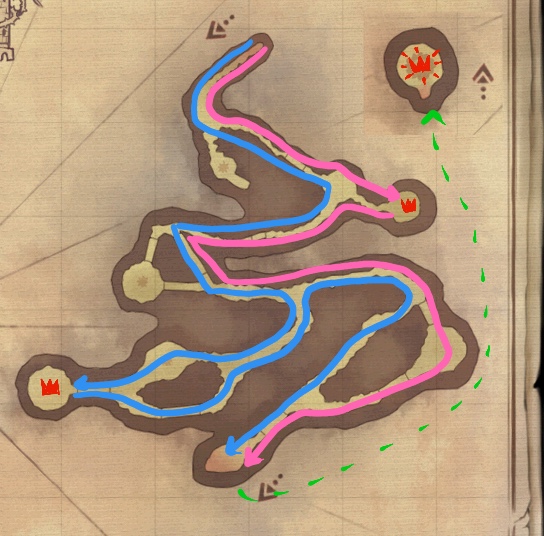
The two route clear of Kalgas Cave dramatically reduces the clear time by cutting the amount of running down substantially (since so much of the running is backtracking).

In a two route clear, it's very easy to full-clear the dungeon, and the routes shown below illustrate how to easily cover all enemy spawns.

To speed this up even further, players from the second group (that takes on the second totem and second mini-boss) can be teleported (or couple teleport) to the first group after clearing their side. Doing so can approximately halve the time it takes to clear the dungeon.

📔
Blessed/Cursed gear