Clockworks Flyff Wiki
  • Welcome
    • Overview
    • Quickstart Guide
  • FAQ
  • Discord
  • 🌸Seasons
    • What are Seasons?
    • Season FAQ
    • Season 6 Changes
      • Milestones
      • Season 6 Battle Pass
    • Season Rewards (Tiers)
  • ⚙️Systems
    • Achievements
    • Important NPCs
    • Clockwork Tokens (CWT)
      • Pang's Discount Store (Pang Bundle)
      • Scroll of Premium
      • Scroll of Party Level Save
      • Scroll of Couple Level Save
    • Clockworks Chips
    • Angel Coins
    • Voting and VP
      • Discord vote notifications
      • API vote tracker
    • Furniture
    • Stat Dice
    • Parties
    • Guilds
    • Sphere Grid
    • Upgrading
      • Awakening & Angel Awakening
      • Ultimate & Angelic Conversion
      • Jewel Setting and Creation
      • Weapon reroll
      • Monster Cards and Piercings
    • Pets
      • Pickup pets (buff pets)
      • Raised pets (stat pets)
    • Blessed & Cursed Exchange
    • Hephaestus Weapons (Star Weapons)
  • ⚡Features
    • Record Book
    • Anarchy
    • Angel Rank
    • Chat Rooms
    • Legend Score
    • Daily Quests & Eldeon Quest
    • Server Quests
    • Request Money for Mail
    • Equip Switch
    • Glyphs
    • Couple
    • Farm Counter
    • Tank AI
    • Damage Statistics & Testing Grounds
    • Challenges
    • Collecting
    • Loot Auctions
    • Solo Self-Found Mode (SSF)
  • 🎉Activities
    • World bosses
      • Rangda & Aahan
    • Eldeon's Castle Raid
    • Rifts
    • Dungeons (system)
    • Colosseum Stadium
    • Endless Tower
    • Asmodan's Trials
    • Hunter Games
    • PvP
      • Royal Rumble
      • Siege/Memento Siege
      • Guild Clash
    • Rainbow Race
    • Stoney's Rock Counting Game
  • ✨Quality of Life
    • Teleporter
    • F-Tool
    • Itemlist
    • Shop Search
    • Parties & Party Finder
    • Guild Finder
    • Raised Pet Reroll (Quick Pet Mistake)
    • Guaranteed upgrades
    • Inventory management
      • Petfilter
      • Backpack & Extra Bags
      • Quick Sell & Buy Back
    • Automatic Powerups & Powerup Bag
    • Buffs
    • AFK Vendor & AFK Collector
    • Miscellaneous QoL
      • Consumable Shop
      • Enemy Aggro Indicator
      • Chat Shortcuts
      • Stat Bonus Display
      • Guild Nicknames
  • 📔Guides
    • Classes Guide
      • Templar
      • Slayer
      • Seraph
      • Forcemaster
      • Mentalist
      • Arcanist
      • Crackshooter
      • Harlequin
    • General Progression Guide
    • Upgrading Guide
    • Leveling Guide
    • Dungeons Guide
      • Savage Wilds
      • Isle of Nightmares
      • Abyssal Cove of the Ancients
      • La Christiana A
      • Aminus & Cursed Aminus
      • Catacombs of Anguish
      • Ankou's Asylum
      • Kalgas Cave
      • Snowy Peaks
      • Sky Forest
      • Blessing of Deathwing & Curse of Deathwing
      • Craft of Hephaestus
      • Dark Trails
      • Mysterious Garden
      • Ragefire Chasm
      • Stratholme
    • Class Gear Guides
      • Templar Gear Guide
      • Slayer Gear Guide
      • Seraph Gear Guide
      • Forcemaster Gear Guide
      • Mentalist Gear Guide
      • Arcanist Gear Guide
      • Crackshooter Gear Guide
      • Harlequin Gear Guide
    • Awakening Guide
    • Pet Bead Guide
    • How do I...?
    • Where do I...?
  • 🔍Detailed Information
    • Overview
    • Details: Parties
    • Details: Maps
    • Details: Angel Rank
    • Details: Raised Pets
    • Details: Legend Score
    • Details: Guild Level Buffs
    • Details: Anarchy Buffs
    • Details: Siege Medals
    • Details: The Colosseum
    • Details: Royal Rumble & Marks of Death
    • Details: Set Upgrade Bonuses
    • Details: Jewelry
      • Jewelry: Savage Wilds
      • Jewelry: Templar
      • Jewelry: Slayer
      • Jewelry: Seraph
      • Jewelry: Forcemaster
      • Jewelry: Mentalist
      • Jewelry: Arcanist
      • Jewelry: Crackshooter
      • Jewelry: Harlequin
    • Details: Upgrade Rates
    • Details: Jewels
    • Details: Collecting
    • Details: Couple
    • Details: Class/Job Tree
    • Details: Monster HP/XP Table
    • Details: Auras and Weapon Glow
Powered by GitBook
On this page
  1. Guides
  2. Dungeons Guide

Savage Wilds

PreviousDungeons GuideNextIsle of Nightmares

Last updated 1 year ago

The Savage Wilds is a dungeon primarily completed for sets, which are very powerful when completed, and required to craft . Additionally, Savage Wilds drops Lusaka's Crystal weapons, in addition to Khan's Sigil (Hard Mode only), both of which are used to craft .

For many classes, Lusaka's Crystal Weapons can be a significant upgrade to their level 120 weapons, though some are not preferred due to providing less useful stats.

The boss has a rare chance to drop the [Ultimate] Khan Card, which is a very powerful monster card used for magic damage classes.

The dungeon features 4 totem minibosses that must be killed before the boss spawns.

You might need more HP than the recommended amount for Savage Wilds. The boss can double hit, and if both the hits crit, they can deal a massive amount of damage! It's recommended to upgrade your suit to +15 element and use pet beads to maximize your HP and melee block rate.

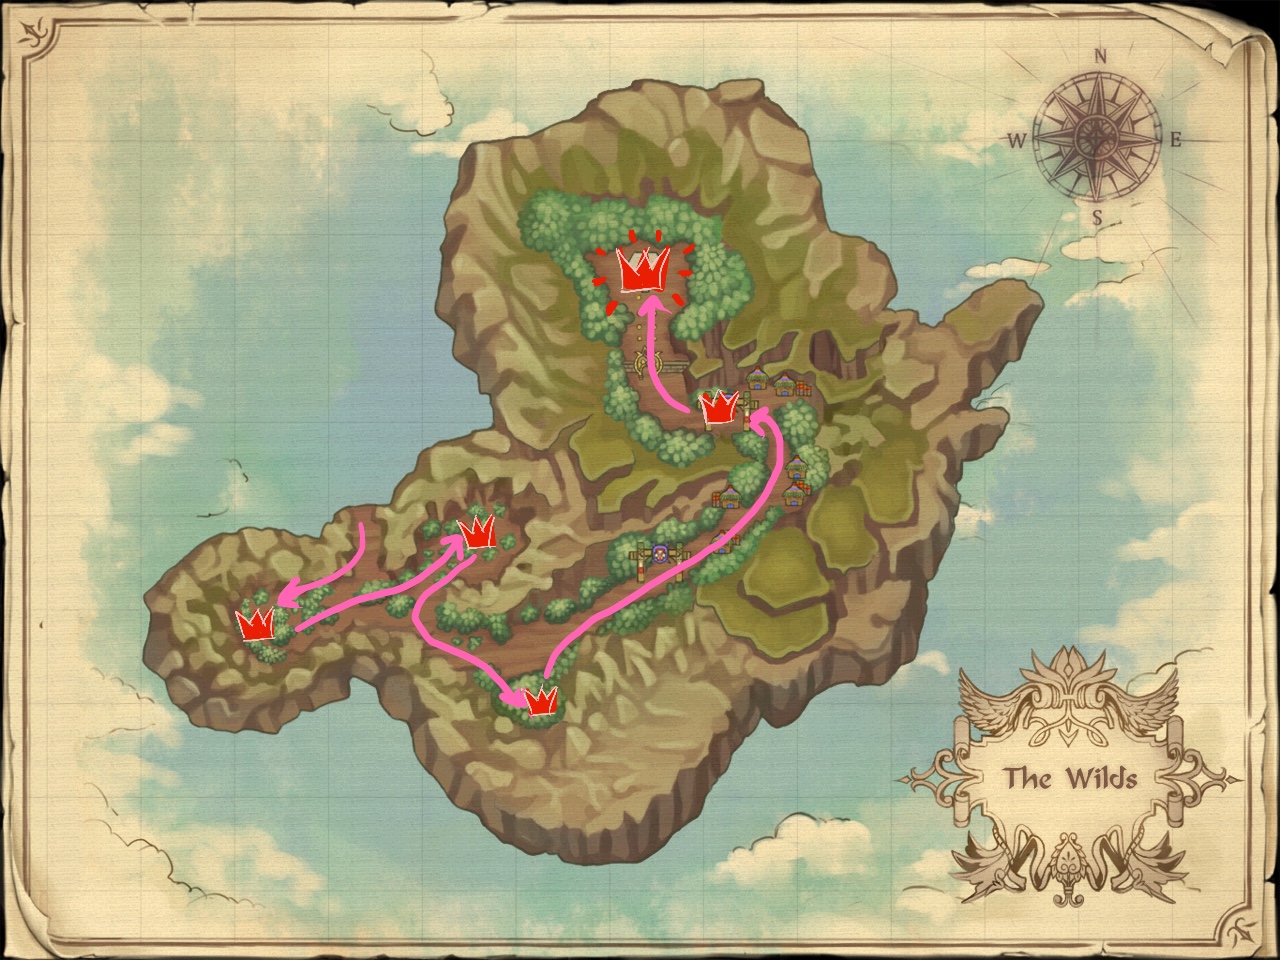
The single route clear of Savage Wilds is straightforward. You'll start the dungeon by going to the right and taking out the first totem. You'll then double back, passing the entrance, and the second totem will be on the left. The third totem is hidden in the back behind some trees, and the last totem is on the way to the boss.

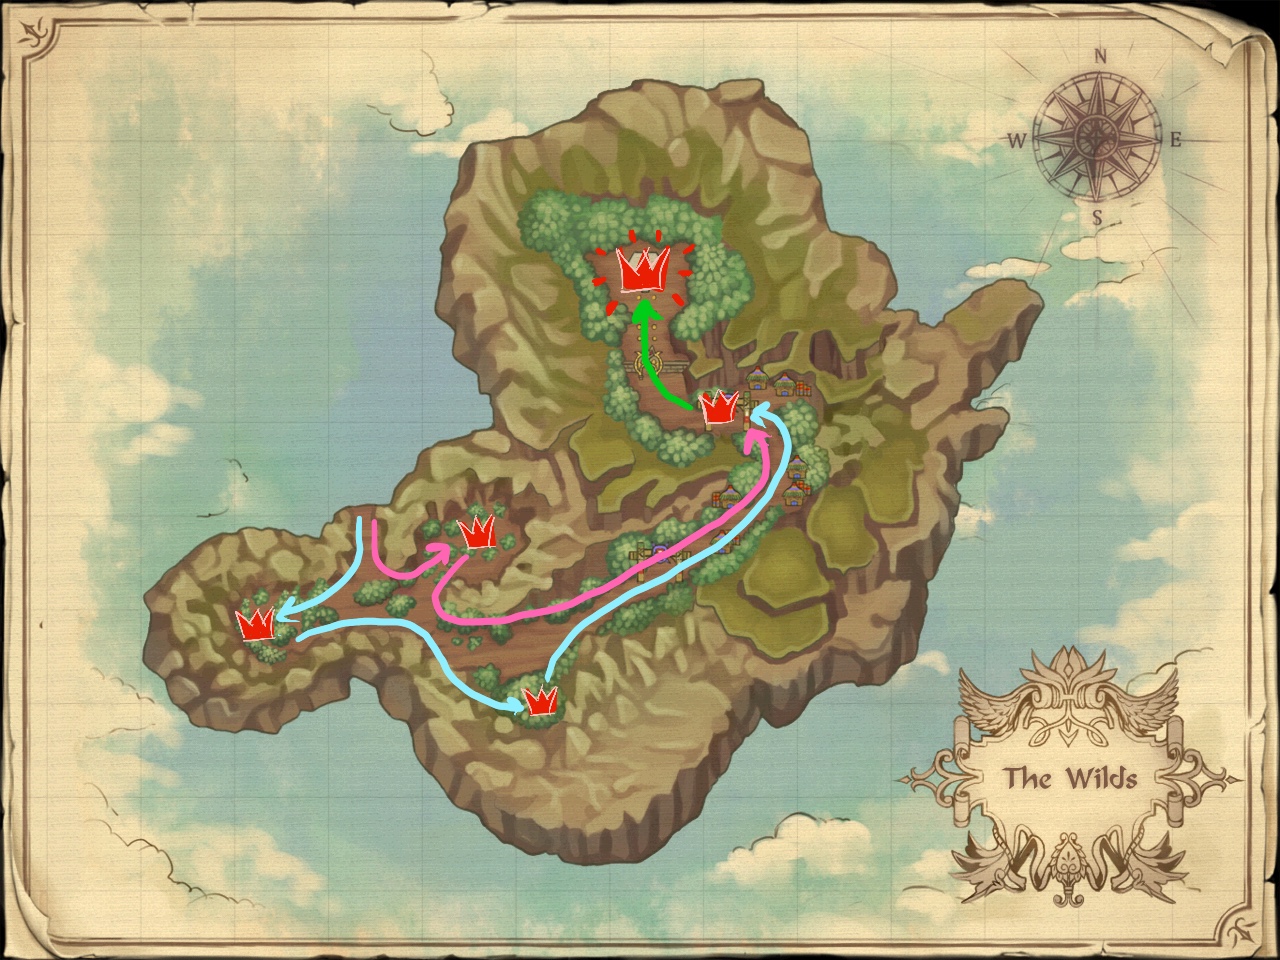
The two route clear of Savage Wilds splits the party up at the first fork, with one side clearing all the totems on the left, and the other clearing all the totems on the right. Both groups will meet up at the boss.

📔
Savage Wilds Jewelry
Level 150 Jewelry
Hephaestus Tokens