Clockworks Flyff Wiki
  • Welcome
    • Overview
    • Quickstart Guide
  • FAQ
  • Discord
  • 🌸Seasons
    • What are Seasons?
    • Season FAQ
    • Season 6 Changes
      • Milestones
      • Season 6 Battle Pass
    • Season Rewards (Tiers)
  • ⚙️Systems
    • Achievements
    • Important NPCs
    • Clockwork Tokens (CWT)
      • Pang's Discount Store (Pang Bundle)
      • Scroll of Premium
      • Scroll of Party Level Save
      • Scroll of Couple Level Save
    • Clockworks Chips
    • Angel Coins
    • Voting and VP
      • Discord vote notifications
      • API vote tracker
    • Furniture
    • Stat Dice
    • Parties
    • Guilds
    • Sphere Grid
    • Upgrading
      • Awakening & Angel Awakening
      • Ultimate & Angelic Conversion
      • Jewel Setting and Creation
      • Weapon reroll
      • Monster Cards and Piercings
    • Pets
      • Pickup pets (buff pets)
      • Raised pets (stat pets)
    • Blessed & Cursed Exchange
    • Hephaestus Weapons (Star Weapons)
  • ⚡Features
    • Record Book
    • Anarchy
    • Angel Rank
    • Chat Rooms
    • Legend Score
    • Daily Quests & Eldeon Quest
    • Server Quests
    • Request Money for Mail
    • Equip Switch
    • Glyphs
    • Couple
    • Farm Counter
    • Tank AI
    • Damage Statistics & Testing Grounds
    • Challenges
    • Collecting
    • Loot Auctions
    • Solo Self-Found Mode (SSF)
  • 🎉Activities
    • World bosses
      • Rangda & Aahan
    • Eldeon's Castle Raid
    • Rifts
    • Dungeons (system)
    • Colosseum Stadium
    • Endless Tower
    • Asmodan's Trials
    • Hunter Games
    • PvP
      • Royal Rumble
      • Siege/Memento Siege
      • Guild Clash
    • Rainbow Race
    • Stoney's Rock Counting Game
  • ✨Quality of Life
    • Teleporter
    • F-Tool
    • Itemlist
    • Shop Search
    • Parties & Party Finder
    • Guild Finder
    • Raised Pet Reroll (Quick Pet Mistake)
    • Guaranteed upgrades
    • Inventory management
      • Petfilter
      • Backpack & Extra Bags
      • Quick Sell & Buy Back
    • Automatic Powerups & Powerup Bag
    • Buffs
    • AFK Vendor & AFK Collector
    • Miscellaneous QoL
      • Consumable Shop
      • Enemy Aggro Indicator
      • Chat Shortcuts
      • Stat Bonus Display
      • Guild Nicknames
  • 📔Guides
    • Classes Guide
      • Templar
      • Slayer
      • Seraph
      • Forcemaster
      • Mentalist
      • Arcanist
      • Crackshooter
      • Harlequin
    • General Progression Guide
    • Upgrading Guide
    • Leveling Guide
    • Dungeons Guide
      • Savage Wilds
      • Isle of Nightmares
      • Abyssal Cove of the Ancients
      • La Christiana A
      • Aminus & Cursed Aminus
      • Catacombs of Anguish
      • Ankou's Asylum
      • Kalgas Cave
      • Snowy Peaks
      • Sky Forest
      • Blessing of Deathwing & Curse of Deathwing
      • Craft of Hephaestus
      • Dark Trails
      • Mysterious Garden
      • Ragefire Chasm
      • Stratholme
    • Class Gear Guides
      • Templar Gear Guide
      • Slayer Gear Guide
      • Seraph Gear Guide
      • Forcemaster Gear Guide
      • Mentalist Gear Guide
      • Arcanist Gear Guide
      • Crackshooter Gear Guide
      • Harlequin Gear Guide
    • Awakening Guide
    • Pet Bead Guide
    • How do I...?
    • Where do I...?
  • 🔍Detailed Information
    • Overview
    • Details: Parties
    • Details: Maps
    • Details: Angel Rank
    • Details: Raised Pets
    • Details: Legend Score
    • Details: Guild Level Buffs
    • Details: Anarchy Buffs
    • Details: Siege Medals
    • Details: The Colosseum
    • Details: Royal Rumble & Marks of Death
    • Details: Set Upgrade Bonuses
    • Details: Jewelry
      • Jewelry: Savage Wilds
      • Jewelry: Templar
      • Jewelry: Slayer
      • Jewelry: Seraph
      • Jewelry: Forcemaster
      • Jewelry: Mentalist
      • Jewelry: Arcanist
      • Jewelry: Crackshooter
      • Jewelry: Harlequin
    • Details: Upgrade Rates
    • Details: Jewels
    • Details: Collecting
    • Details: Couple
    • Details: Class/Job Tree
    • Details: Monster HP/XP Table
    • Details: Auras and Weapon Glow
Powered by GitBook
On this page
  1. Guides
  2. Dungeons Guide

Ankou's Asylum

PreviousCatacombs of AnguishNextKalgas Cave

Last updated 1 year ago

Ankou's Asylum drops level 130 weapons which are the penultimate weapon for every class. Additionally, the level 130 weapons (as well as Ankou's Sigil from Hard Mode) are used in crafting .

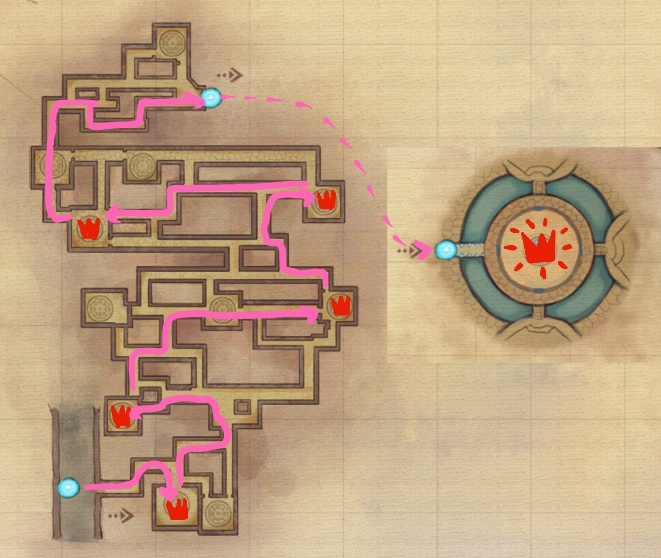
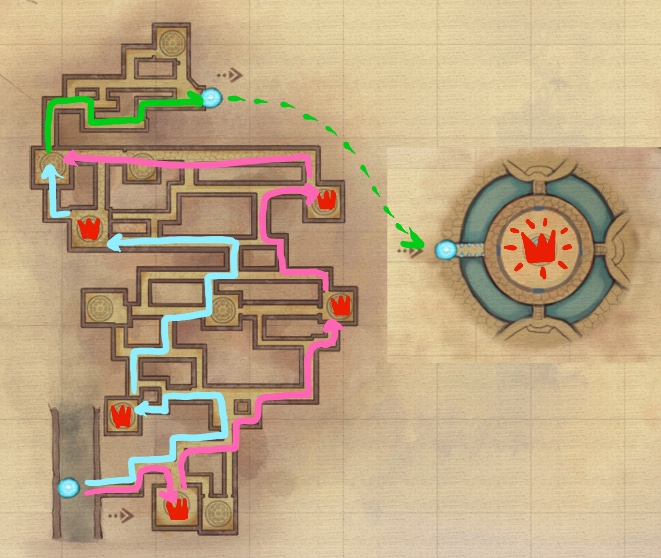
The dungeon features a maze-like structure, with 5 totems that must be destroyed in order to spawn the boss.

Ankou is one of the most commonly run dungeons, since the weapon drops are valuable at all stages of the game (early on for gear, later for , and finally for tokens). The [Ultimate] Ankou Card is also commonly used by tanks in end-game dungeons, since the DEF+10% and HP+10% is more consistent than the [Ultimate] Red Meteonyker Card.

In the one route clear of this dungeon, it's recommended to not full-clear. Because of the nature of the map, full clearing on a single route will lead to a ton of backtracking and winding turns that can make it very difficult to track which corridors have and haven't been cleared, leading to headaches when you get to the boss with a few enemies missing.

In the two-route clear of this dungeon, one half of the team will take the left side of the map, while the other will take the right side of the map. Players can adjust their routes as needed depending on if they're full-clearing the dungeon.

Depending on clear times of each side, the two groups will either meet back around the final totem or regroup at the boss.

📔
Hephaestus Tokens
advanced re-roll dust